
If you own a website or a blog, then you must know how important it is to have a fast loading website. Any website that opens slow or has a low speed of loading is sure to lose traffic as none of the viewers like to wait much.
It is estimated that if a page doesn’t load within 5-8 seconds you will lose 1/3 of your visitors. Thus it is very important to keep the website fast so that it takes a little time to load and display the entire page properly. Checking a website for speed and load time is not difficult, all you need is a third party service that checks it.
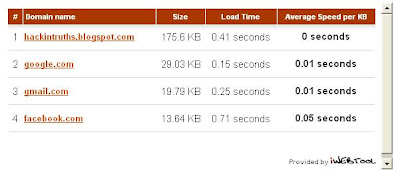
There are many online websites that checks the speed and load time of a website, here is one that I liked the most. The web service is called selfseo and provides a free website speed checker. All you need to do is just enter the name of the website or the page to check, click the Check button and it will display the load time (in seconds) and the speed of the website.
Moreover if you have more than one website to check, you can provide at the max 10 websites to check the speed. This feature will help you compare the load time and the speed with the other sites and your competitors.
If you find your website to be slow enough, then you should consider changing the design and post styles of your website, site structure or just move to a new and fast loading server.
Click here to Visit Website Speed Checker
It is estimated that if a page doesn’t load within 5-8 seconds you will lose 1/3 of your visitors. Thus it is very important to keep the website fast so that it takes a little time to load and display the entire page properly. Checking a website for speed and load time is not difficult, all you need is a third party service that checks it.

There are many online websites that checks the speed and load time of a website, here is one that I liked the most. The web service is called selfseo and provides a free website speed checker. All you need to do is just enter the name of the website or the page to check, click the Check button and it will display the load time (in seconds) and the speed of the website.
Moreover if you have more than one website to check, you can provide at the max 10 websites to check the speed. This feature will help you compare the load time and the speed with the other sites and your competitors.
If you find your website to be slow enough, then you should consider changing the design and post styles of your website, site structure or just move to a new and fast loading server.
Click here to Visit Website Speed Checker


Look for Appz in Parent Directory
intext:"parent directory" intext:"[EXE]"
intext:"parent directory" index of:"[EXE]"
intext:"parent directory" index of:"[RAR]"
Note: This will look for any exe or optionaly for zip, rar, ace, iso, bin and etc.
Look for Moviez in Parent Directory
intext:"parent directory" intext:"[VID]"
intext:"parent directory" index of:"[VID]"
Note: This will look for any video filetype in parent directory. You can optionaly add index:"xvid" or intext:"divx" for specific codec movie.
Look for Music in Parent Directory
intext:"parent directory" intext:"[MP3]"
intext:"parent directory" index of:"[MP3]"
Note: This will look for any music files.
Look for Gamez in Parent Directory
intext:"parent directory" index of:"[Gamez]"


To install google doodle of your choice:

- First go to this webstore of google.
- Now click on install under favourite doodle so that you can set the default doodle of your choice. (Remember you have to use chrome browser for this thing to work)
- Now go to the google doodles page.
- Choose the doodle which you like and click on Make This My Favourite Doodle! under the doodle which you want.

- Now to check your doodle go to Google Home Page.
You
have finally set the doodle of your choice. You have thousands of
doodle to choose from. Now style your google homepage the way you want.


Now to save the information of it's users google lauched a service named Takeout which people can use to backup all their data on available on google with a click. Keeping in mind the importance of the google users information, google has done a great job by launching this service. This service is brought to you by The Data Liberation Front.
What all information you can take a backup of :
- The list of the sites you did a +1
- Your Buzz data.
- Your Contacts and Circles.
- Your Picasa Albums.
- Your Google Profile.
- Your google plus Stream data.
Note: You can even backup a particular data if you want.
How to backup?
- Firstly visit http://www.google.com/takeout
- Now sign in to the google account you want to take the backup of.
- Now if you want to take the backup of all your data then simply click on Create Archive.

- Or if you want to backup a particular data then firstly click on Choose Services and then select the service you want to take the backup of (you can select multiple services) and then finally click on Create Archive.

- Once you click on create archive the processing will start. After the processing completes simply click on the download button and then the downloading will start.

Now you have all your google data in your computer and you need not to worry of it's being lost by some mistake. Enjoy and keep watching..

Microsoft reserves 20% of your available
bandwidth for their own purposes like Windows Updates and interrogating
your PC etc. Don't you want to get it back for your self? Here is the
trick how to get 100% of your available bandwidth.

Step 1: Click Start then Run and type "gpedit.msc" without quotes. This opens the "group policy editor" and go to: "Local Computer Policy"
Step 2: Then click on "Computer Configuration" Then "Administrative Templates"
Step 3: Now select "Network" then "QOS Packet Scheduler"
Step 4: After that select "Limit Reservable Bandwidth".
Step 6: Double
click on Limit Reservable bandwidth. It will say it is not configured,
but the truth is under the 'Explain' tab i.e." By default, the Packet
Scheduler limits the system to 20 percent of the bandwidth of a
connection, but you can use this setting to override the default."

So the trick is to ENABLE reservable bandwidth, then set it to ZERO. This will allow the system to reserve nothing, rather than the default 20
![Get upto 100 MBPS Internet speed [Funny Trick]](https://blogger.googleusercontent.com/img/b/R29vZ2xl/AVvXsEhShHtpzCJy0VOvKOpL_U7y7IBm6YtAveno14asL7CgUMkfg6ijKvBEhcujDlbQZ_oaBvwWBPfnSWafQhQ8KSEc1ftIYE4e9hKy7nnbZIWl-nshUFs4w4ClEpzH9mN6tdEIE_sAzeS-R8sL/s72-c/untitled16.JPG)

1st, You need to create a home server (PHP OR
HTTP any thing you want) on your PC. You can use tools like “XAMPP” OR “WAMP”
OR “EASY PHP”.
2nd, Now open the
folder “htdocs” (For XAMPP) or “www” (For WAMP & EASY PHP). And copy-paste
your file there which you want to download.
3rd, Then start the server and open “127.0.0.1”
or “localhost” on your browser.

4th, Now find the file out and download it form your home server. You should get up to 100 MBPS speed depending on your Processor and HDD speed. I got 20 MBPS Speed form my PC.
Note: If your friend is really smart, he will find your trick. To fool your friends completely you need
some domain name. To create your domain for your localhost, Explore %systemroot%\system32\drivers\etc
and open "hosts" with notepad or any text editor. Then change the “localhost” to anything you want.
You can also add a second line for another domain. Use 127.0.0.1 as your IP address.

So ENJOY this trick.. Fool your friends and comment here.


This is a little facebook app that allows you to post animated smileys on your wall or your friends wall.
Step 1: Goto: https://apps.facebook.com/animated-picture/
Step 2: Select "Emoji Emoticons"
Step 3: Type your message then just select smileys from below which you want to post.
Step 4: Select all text [Ctrl + A] then copy it [Ctrl + C] click "Send"
Step 5: A pop-up will appear, post your copied text [Ctrl + V] and hit send.
Step 6: You are done ;)
Step 1: Goto: https://apps.facebook.com/animated-picture/
Step 2: Select "Emoji Emoticons"
Step 3: Type your message then just select smileys from below which you want to post.
Step 4: Select all text [Ctrl + A] then copy it [Ctrl + C] click "Send"
Step 5: A pop-up will appear, post your copied text [Ctrl + V] and hit send.
Step 6: You are done ;)

You can use a trial
version of windows 7 without using cracks or keys. By this way
you can not only avoid piracy but also use the original windows for
free.
After you have your trial version of windows 7 installed in your computer, just follow the below steps:
After you have your trial version of windows 7 installed in your computer, just follow the below steps:
- Firstly you need to check how many days are left for your windows to expire so for that click on start then right click on computer and click on properties.

- Now at the bottom of the windows which will open you will see the days left under the heading Windows activation.

- Now on the last day of your windows go to start and type command in the search box and right click on command prompt and click on run as administrator.

- Now in the command prompt type slmgr -rearm and press enter.

- After some seconds you will get a dialog box open up showing that the command completed successfully.

Now this will reset your windows trial for more 30 days. You can repeat the process 3 times
i.e. you will get 120 days. Now to use this trick 8 times more so that
you can use windows for another 240 days here are the steps:
- Click on start and type regedit and click on regedit and then click on yes (if asked). If you think that you may make some mistake while following the steps below then it is better to backup your registry which you read from here.

- Now navigate to HKEY_LOCAL_MACHINE =>SOFTWARE =>Microsoft => Windows NT =>CurrentVersion => SoftwareProtectionPlatform
- Now in the right side double click on SkipRearm and change it's value from 0 to 1 and click on ok.

Now you can use windows for 120 days before editing registry and 240 days after editing it. So in total you can use the windows for 360 days i.e 1 year.
If you want to make this process automatic then:
- Open notepad and there type slmgr -rearm and save it as anything.bat
- Now schedule this file to run automatically using windows Task Scheduler on a particular date i.e. after every 30 days.
Subscribe to:
Posts (Atom)
Popular Posts
-
Hack / Bypass .asp sites using SQL Injection
 Hack any .asp sites with SQL Injection attack. 1st, Open Google and search for adminlogin.asp or admin\login.asp 2nd, Open any searc...
 -
What is Captcha ????
 CAPTCHA stands for C ompletely A utomated P ublic T uring test to tell C omputers and H umans A part . A CAPTCHA is a...
 -
Get upto 100 MBPS Internet speed [Funny Trick]
Today I will show you how to Fool your friends. They should think that you have internet connection up to 100 MBPS speed. 1 st ,...
-
WEAKERTHAN - Another OS For Hackers
 Weakerthan 3.6 OS for Hackers Most of the hackers would have heard about Backtrack. Weakerthan is another Linux based pentesting...
 -
DNN Method - Website Hacking
 Step 1 : http://www.google.com Step 2: Now enter any of these dorks. 2nd dork is best for this type of hacking. :inurl:/tabid/36/l...
 -
Hack YAHOO ids by Brute Force Attack
 Today i will show you how to hack yahoo ids by brute force attack.. Step 1: Download Brutus Force from Here and Extract it on desk...
 -
How to Run Mobile Games on PC
 How to Run Java mobile Games On PC 1st, Download KEmulator from the link bellow. 2nd, Extract and run KEmulator.exe 3rd, Goto...
 -
How to Unlock your Cellphone
 What are Unlocked Cellphones? and Why anybody would want to Unlock it? An Unlocked Cellphone is one that can be used on all networks ...
 -
EmbeePay - Legit or Scam ??
 EmbeePay is one of the most popular sites providing free mobile recharge on Facebook. There is so Many people working hard receive a free r...
 -
Reset Samsung Mobile Tracker Code
 These Code Reset All Code In Your Samsung Mobile(Any Model) Samsung Tracker Code Also Reset By These Codes If You Forget Your Code...